
|
You are here : Administrator Tools > User Management > Company Master Company Master
|
An organization may have multiple companies and multiple sites within each company. IMMS caters to this requirement by allowing a user to log in to a particular company and its site provided that user has rights to do so. See "User Management" to know how to associate a user with a Company. To do so IMMS needs to maintain information regarding each and every company.
This master allows to add and maintain some general information related to each company such as name, address, contact details and much more. Apart from this, it also specifies the Modules and the databases associated with a particular company.
Enter any text you want to search in the list below. The search is applicable to all columns of the list. Once the text is entered, press <ENTER> key. As a result, the list will be refreshed with all those records that contain the entered text fully or partially. In order to go back to the original list, remove the text from the box and press <ENTER> key again.
 Companies can be added, edited, and viewed provided the Role associated with the currently logged-in user through User Management has the respective rights to do so.
To 'Add' a Company, click on the  button and to 'Edit', click on the
  icon on its corresponding record. To 'View' details of a particular Company, <DoubleClick> on that record. As a result, following screen will be displayed -

Once a Company has been defined, it can not be deleted.
Company Code:
(Type : Alphanumeric, Length : 3)
Denotes the Code of a Company.
While 'Adding' a new Company, enter a unique Code for that company. This is the Code by which a company will be referred to through out IMMS. The system ensures that the entered Code is a unique one.
In case of 'Edit' and 'View', Company Code will be displayed automatically for the selected record. It can not be changed.
Company Name:
(Type : Alphanumeric, Length : 50)
Denotes the name of the Company.
While 'Adding' a new Company, enter the full name of that company. This name will appear in all entry forms as well as reports. So please be careful while entering it.
In case of 'Edit'and 'View', name of the selected Company will be displayed automatically. You can not change it in 'Edit' mode.
Financial Year:
(Type : Alphanumeric, Length : 5)
Denotes the financial year for the Company.
While 'Adding' a new Company, enter the financial year for that company in the format of yy-yy.
In case of 'Edit'and 'View', financial year of the selected Company will be displayed automatically. You can not change it in 'Edit' mode.
Start Date:
Denotes the Start Date of the entered financial year for the Company.
While 'Adding' a new Company, enter the Start Date for the financial year for that company in the format of dd-mm-yy.
In case of 'Edit'and 'View', Start Date will be displayed automatically. You can not change it in 'Edit' mode.
End Date:
Denotes the End Date of the entered financial year for the Company.
While 'Adding' a new Company, enter the End Date for the financial year for that company in the format of dd-mm-yy.
In case of 'Edit'and 'View', End Date will be displayed automatically. You can not change it in 'Edit' mode.
This is EOU Unit Company?
Denotes whether the Company is a Export Oriented Unit Company or not.
While 'Adding' a new Company, turn the flag 'On' by clicking on it if its an EOU Company. Otherwise, keep it 'Off'.
In case of 'Edit'and 'View', status of this field will be displayed automatically. You can change it in 'Edit' mode.
Click on the  button to continue.

Address Line 1:
(Type : Alphanumeric, Length : 40)
While 'Adding' a new Company, enter the postal address of your company.
In case of 'Edit'and 'View', Address - 1 of the selected Company will be displayed automatically. You can change it in 'Edit' mode.
Address Line 2:
(Type : Alphanumeric, Length : 40)
While 'Adding' a new Company, continue to enter the postal address of your company.
In case of 'Edit'and 'View', Address - 2 of the selected Company will be displayed automatically. You can change it in 'Edit' mode.
Address Line 3:
(Type : Alphanumeric, Length : 40)
While 'Adding' a new Company, continue to enter the postal address of your company.
In case of 'Edit'and 'View', Address - 3 of the selected Company will be displayed automatically. You can change it in 'Edit' mode.
City:
Denotes the City of the Company.
While 'Adding' a new Company, click on the field to access a list of already existing Cities defined through City-State-Country Master option. Select your desired City from the list by clicking on it. Alternatively you can also enter the City Code.
In case of 'Edit'and 'View', City of the selected Company will be displayed automatically. You can change it in 'Edit' mode.
Pin Code:
(Type : Alphanumeric, Length : 10)
Denotes the Pin Code of the address.
While 'Adding' a new Company, enter the pin code of the area where your company resides.
In case of 'Edit'and 'View', Pin Code will be displayed automatically. You can change it in 'Edit' mode.
State:
State Code and Name of the selected City will be displayed automatically as specified through City-State-Country Master option. It can not be changed.
Country Code & Name:
Country Code and Name of the State will be displayed automatically as specified through City-State-Country Master option. It can not be changed.
Click on the button to continue.

Telephone Number:
(Type : Alphanumeric, Length : 40)
While 'Adding' a new Company, enter its Telephone Number.
In case of 'Edit'and 'View', Telephone No of the selected Company will be displayed automatically. You can change it in 'Edit' mode.
Fax Number:
(Type : Alphanumeric, Length : 40)
While 'Adding' a new Company, enter its Fax Number.
In case of 'Edit'and 'View', Fax Number of the selected Company will be displayed automatically. You can change it in 'Edit' mode.
Email Address:
(Type : Alphanumeric, Length : 40)
While 'Adding' a new Company, enter its Email Address.
In case of 'Edit'and 'View', Email Address of the selected Company will be displayed automatically. You can change it in 'Edit' mode.
Website:
(Type : Alphanumeric, Length : 40)
While 'Adding' a new Company, enter its Website Address.
In case of 'Edit'and 'View', Website Address of the selected Company will be displayed automatically. You can change it in 'Edit' mode.
Click on the button to continue.

Currency:
Denotes the Currency in which the Company deals in.
While 'Adding' a new Company, click on the field to access a list of already existing Currencies defined through Currency Master option. Select your desired Currency from the list by clicking on it. Alternatively you can also enter the Currency Code.
In case of 'Edit'and 'View', Currency will be displayed automatically for the selected Customer. You can change it in 'Edit' mode.
Effective Date:
Denotes the Date from which the Currency is effective.
While 'Adding' a new Company, enter/select the Date from which the Currency will be effective for the Company.
In case of 'Edit'and 'View', Effective Date will be displayed automatically for the selected Customer. You can change it in 'Edit' mode.
Click on the button to continue.

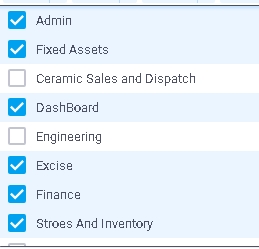
Specify the Modules of IMMS that should be available for the Company. Click on the field. A list of all Modules available in IMMS will be displayed in a grid as follows -
|
Click on the small white box to select or un-select a particular Module. Only the selected Modules will be available for the selected Company. |
Please note that while 'Adding' a new Company, this grid will display all Modules as un-checked.
But in case of 'Edit'and 'View', the grid will display relevant Modules as checked for the selected Company. You can not change in 'Edit' mode.
Click on the button to continue.

This section maintains certain other information related to the Company such as VAT No, TIN No, PAN No and many more.
A list of all such Captions defined for 'Company' through Statutory and Other Caption Detail option will be displayed on the screen.
Please note that while 'Adding' a new Company, values of these fields will be displayed blank. Click on the respective space and enter the relevant data.
But in case of 'Edit'and 'View', the screen will display relevant details for each Caption as specified for the selected Company. You can change them in 'Edit' mode.
Click on the button to continue.

This section maintains the information related to the external finance system that needs to be integrated with IMM-TNG.
Need external Financial System integration:
Denotes whether the integration between IMMS and an external financial system is needed or not.
While 'Adding' a new Company, select either 'Yes' or 'No' from the given popup as per your requirement. Press <TAB>.
In case of 'Edit'and 'View', the value of this field will be displayed automatically for the selected Company. You can change it in 'Edit' mode.
DataBase Location Path:
Stores the location of the external financial database.
While 'Adding' a new Company, enter the path of the external financial database.
In case of 'Edit'and 'View', the path will be displayed automatically for the selected Company. You can change it in 'Edit' mode.
Click on the button to continue.

This section maintains the information related to the database of the Company.
Database Name:
(Type : Alphanumeric, Length : 20)
Denotes the name of the Database for the Company.
While 'Adding' a new Company, name of the Database will be displayed as Company Code + 'IMMS' by default. But it can be changed as per requirement.
In case of 'Edit'and 'View', the name of the Database will be displayed automatically as per the selected Company. It can not be changed in 'Edit' mode.
Sql Server to connect:
Denotes the server for the Database for the Company.
While 'Adding' a new Company, a list of Servers will be displayed. Select the appropriate Server for the Database.
In case of 'Edit'and 'View', the name of the Server will be displayed automatically as per the selected Company. It can not be changed in 'Edit' mode.
Database Location Path:
(Type : Alphanumeric, Length : 255)
Denotes the Location of the Database on the Server.
While 'Adding' a new Company, enter the appropriate path of the Database on Server.
In case of 'Edit'and 'View', the path of the Database will be displayed automatically as per the selected Company. It can not be changed in 'Edit' mode.
This section maintains the information related to the Sql Server for connection purpose.
Authentication Mode:
Denotes the Mode of Authentication to automatically connect to the Database on the Server.
While 'Adding' a new Company, select either 'Sql Authentication' or 'Window Authentication' from the provided list.
In case of 'Edit'and 'View', the Authentication Mode will be displayed automatically as per the selected Company. It can not be changed in 'Edit' mode.
User ID:
(Type : Alphanumeric, Length : 20)
Denotes the User Id to automatically connect to the Database on the Server.
While 'Adding' a new Company, enter the User Id to connect to the Database.
In case of 'Edit'and 'View', the User Id will be displayed automatically as per the selected Company. It can not be changed in 'Edit' mode.
Password:
(Type : Alphanumeric, Length : 40)
Denotes the Password for the User Id to automatically connect to the Database on the Server.
While 'Adding' a new Company, enter the Password for the User Id.
In case of 'Edit'and 'View', the Password will be displayed automatically as per the selected Company. It can not be changed in 'Edit' mode.
Click on the button to continue.

This section saves the details of the company logo.
Image Path:
Denotes the path where the company logo is saved.
While 'Adding' a new Company, click on the Choose File button to select the path of the logo image file. A small window will be displayed to do so. Once the image file is located and selected, the path will be displayed in this field.
In case of 'Edit'and 'View', the path of the Logo file will be displayed automatically as per the selected Company. It can be changed in 'Edit' mode.
Once you have entered all the information, click on 'Save' button to save or 'Cancel' button to discard. The control will go back to the list.